Tuesday, May 28, 2019

Using DataLoader in GraphQL

In my previous post, we created a GraphQL API for student application. In this post, we are going to improve that API and add DataLoader functionality into GraphQL API.
In the API, you will get a following result for the below query. Therefore, we should do an improvement relates to fetching course registration query.
First, we will add merge.js file below. Then we should modify, courseRegistration.js file.
Now, you can query the API again like below and you will see the result.
However, the above implementation contains a huge performance issue. That is, there are situations, that we are fetching the same student and/or course record multiple times. As it is still a small API, you will not see a huge performance issue, but when the API becomes larger, these repetitive & costly database calls should not be there. Therefore, we are going to use DataLoader.
DataLoader will coalesce all individual loads which occur within a single frame of execution (a single tick of the event loop) and then call your batch function with all requested keys.
First, we should install the node module dependency. Then, we can change the merge.js file like below.
You can download the source code for this application from GitHub.

Monday, May 27, 2019

GraphQL with NodeJS

In this post, we are going to create a GraphQL API using NodeJS.
First, we will install the required node modules for the GraphQL API.
Then, we will create Student, Course and CourseRegistration models like below.
Next, we will focus on creating student functionality. In order to do that, we must define GraphQL schema for that. Create index.js file inside graphql/schema directory.
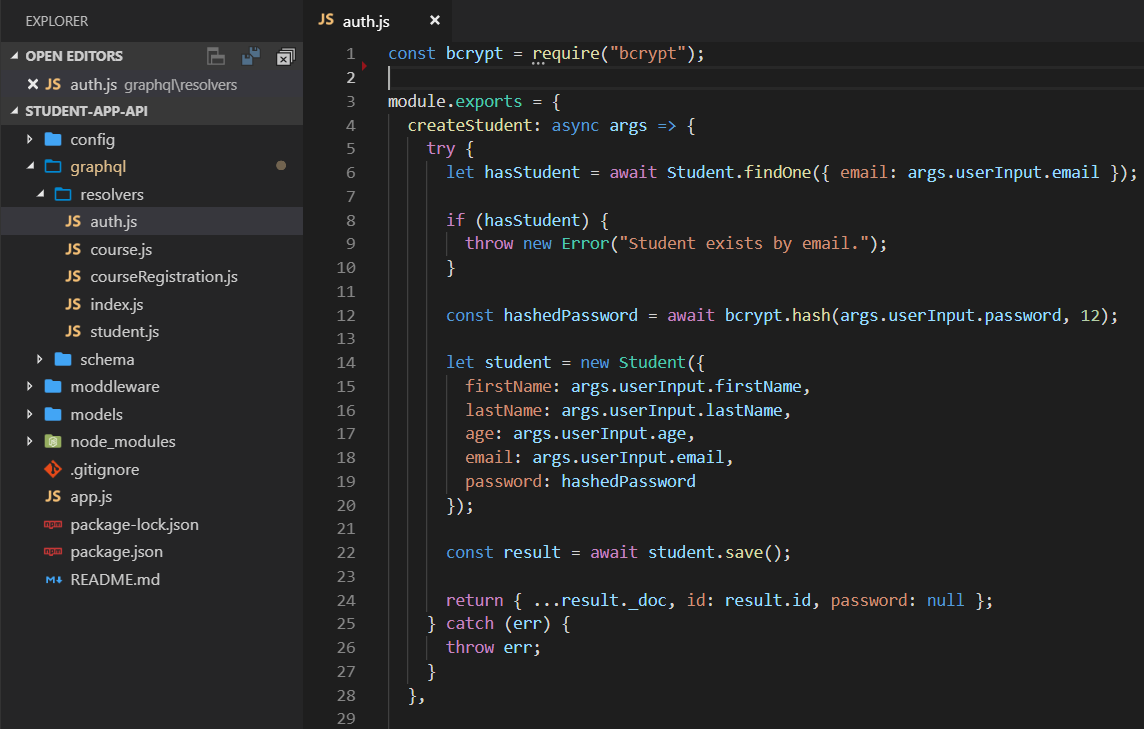
Then we will add a mapping resolver file to create student functionality. We call it auth.js and put it inside graphql/resolvers directory. When we create the student, we must encrypt the password. Therefore, we will use bcrypt node module for that.
As we are going to have many resolvers, we can define a central resolver file like below.
Next, we need to start the NodeJS backend server like below.
As we have enabled, graphiql: true we can make open graphiql console and create a student like below.
In the above implementation, we created a GraphQL mutation functionality. Now we are going to create a query functionality using GraphQL.
First, we add a query for Courses. Then we implement functionality to fetch courses.
We can use graphiql interface to query courses.
Now, we have created basic functionality of a GraphQL API. As developers, we must know how to trigger GraphQL API endpoint using HTTP. I am using Advanced Rest Client tool like below.
After that, you will see the return result like below.
You can download the source code for this application from GitHub.

Sunday, May 12, 2019

Integrate Selector into Redux state management

When we develop any application, we must consider about performance. In React application, when the state change, components will re-render. Even though, the change has happened only in a few fields of the state, but every component will re-render. This may affect to various computations that we do in front end. Therefore, Reselect came into the picture. Following are main reasons to use reselect in ReactJS application.

  • Selectors can compute derived data, allowing Redux to store the minimal possible state
  • Selectors are efficient. A selector is not recomputed unless one of its arguments changes
  • Selectors are composable. They can be used as input to other selectors
First, we will install reselect and then change the ducks file by adding Reslect functionality.
Next, in the StudentList.jsx file, we need to change mapStateToProps.
Next, we should change StudentForm.jsx. Here we need to pass student id as a parameter to the reselect function.
You can download the source code for this application from GitHub.

ReactJS Duck Pattern

In our previous post we continued our implementation of ReactJS application with Redux. Now in our repository we have lots of folders. It is mainly due to separation of functionality. For example, we have actions and reducers. When we develop a component, we have to walk through different folders. Even, when the application become complex, we will have lot of files, which would eventually become difficult to navigate. Therefore, developers introduced Duck pattern, which we can use when we have a scaling ReactJS application.
In basic terms, Ducks is a proposal for bundling reducers, action types and actions when using Redux.
In ducks pattern, there are some predefined guidelines.

  1. Must export default a function called reducer
  2. Must export it's action creators as functions
  3. Must have action types in the form of npm-module/reducer-name/ACTION_TYPE
  4. May export it's action types as upper case, if an external reducer needs to listen to them, or if it is published reusable library
First we will create a constants file in config folder.
 
Then, create index.js file insider ducks/StudentList folder. In this file, we will define action types as constants. Action type value is defined according to the guidelines.
Next we will add actions into this file. Now we can delete our actions folder.
Next, we will add default function for the reducer. Now we can delete reducers folder.
With the above change, we must change our StudentList component.
Then we must modify ConfigStore.js file for student reducer.
Finally, we integrated the ducks pattern which will support us to scale our ReactJS application.

Tuesday, May 7, 2019

React JS Routing

In this post we will continue the application we created in our previous post and add path path based routing into to the application.
First, add a new Route for students like below.
Modify, StudentForm content like below.
Finally modify and remove unwanted code from StudentList file.
Start the application and you can browse through students using path based routing.
You can download the source code for this application from GitHub.

Monday, May 6, 2019

Create React app with Redux

In our previous blog post we create a basic react application. In this post, we will continue with that app. First we will integrate Font Awesome with our application.
Next we will add the actions for students.
Add the StudentForm file like below.
Modify the StudentList file by adding mapStateToProps and mapDispatchToProps.
Finally modify the student reducer file like below.
In your app, when you select a student, it will automatically update the student information section.
You can download the source code for this application from GitHub.

Create a React app by integrating Redux

First generate a ReactJS application using create react app utility.
After it generate successfully, you can start the application and browse through it.
Then we add required dependencies.
Next we are going to integrate Bootstrap with our project. Add Bootstrap style-sheet file and JavaScript files like below.
Next we should add a header for our application. We are going to add the header as a component.
In ReactJS, there are two main components. First one is smart component (containers) and the second one is dumb component (presentation component). Containers are very similar to components, except it aware about the state of the application. If you component is only use to display data, then make it a component.
As the Header will not aware about the application state, we will create the Header as a dumb component.
After that, we will create Home, StudentList and SubjectList containers.
Then we should create the store. In order to create the store, first we must create reducers like below.
After that, we will create the store.
Next we need to configure the router in App.js file.
Finally, we should bind the store with our application.
After you start your application, you will see a basic application in your browser.
Next we can enable Redux dev tools in our application.
You can download the source code for this application from GitHub.