Sunday, December 23, 2012

Client Reports with ASP.net

Create ASP.net Web Forms application. Create Student and StudentFacade class like below. Build the project.
Add a folder called Reports. This folder will contain only the reports that the application will needed. Add new *.rdlc report to reports folder, using report wizard view. Set the data set properties like below.
In the next few pages customize the report design and finish the wizard.
Add new web form called Report.aspx and from the tool box add script manager and report viewer.
In the code behind file of the Report.aspx, in Page_Load method add the following code.
Now run the application and navigate to Report.aspx file. The report will be displayed.

Create and dpeloy SSRS Report

What is *.rdl and *.rdlc report?

*.rdlc files means client reports which we can create through the Visual Studio. But *.rdl files mean the reports that we can design using BIDS and published to reporting server. But *.rdlc files can not published to the reporting server directly. In this post I have have described how to create *.rdl report and access it from the ASP.net web application.

Create the Report

Create a table called Student and it's design should be like below. Enter some data to the table.
Open BIDS. Create Report Server Project like below.
In the solution go to Reports folder and Add New Report.
This will open a wizard which can create a report. We need to provide the data source connection for the report.By clicking on the edit button we can provide the connection.
In the next page, by using Query Builder we can create the relevant SQL statements and also we can run those SQL statements and test the correct data has retrieved. 
After add the query string, in the next few pages we can design the report like; a tabular report, the details that we are going to show, table style and report name. After finished the report wizard, the design view of the report will be displayed. We can do further designing works in there. Also we can have a preview of the report that we created. This will retrieve the actual data from the data base.
Now the report design is finalized.

Deploy *.rdl report in to Report Server

Open reporting services configuration manager and connect to the reporting server.
Go to Report Manager URL.

In there create a new folder and upload the report in to that folder. U can upload more reports to that folder and each one will be displayed. If you click on that particular report, then you can have a nice view of that report.

Access the report using ASP.net Web Application

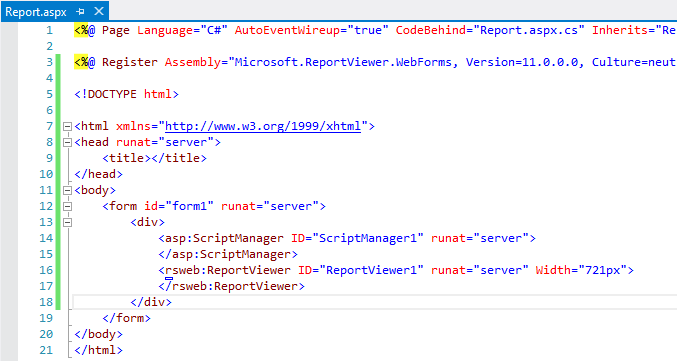
Create ASP.Net web forms application. Add as aspx page called Reports. From the tool box , add Report Viewer and Script Manager to the page.
In the Reporting Services Configuration Manager go to Web Service URL.
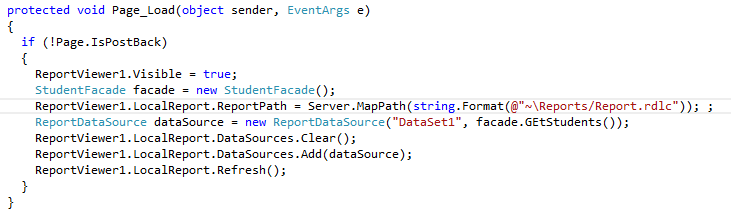
In the code behind file of the Reports web form, add following code.
ServerReport.ReportPath is the path of the report that we can access through the Reports Web Service. If you go to the Reports Web Service you can see the reports that you have deployed to the reporting server, like below.
Now run the ASP.net web application and go to Reports page. Finally you can access the deployed report.

Wednesday, December 5, 2012

TFS Branching

The key goal of branching is to provide isolation between parallel streams of work. Branching enables parallel development by providing each development activity a self-contained snapshot of needed sources, tools, external dependencies and process automation. Having more branches increases complexity and merge costs.

You can have different kinds of branches like Dev, Stable, Release, Feature and etc. We can add permissions to each branch. We have to merge the changes from child to parent branch and vise versa.
You can refer Branching and Merging Guide for more details about these new features in TFS.

In this post I'll explain how to do a Basic Branch Plan using Team Foundation Service.

Below is the structure of Basic Branching of source code.
You need to install TfsBranchToolVSExtension.vsix. To do that download the source code from codeplex. Rebuild the TfsBranchToolVSExtension using Visual Studio 2012. You must have installed,

  • TFS 2012 Object Model (OM) 
  • Visual Studio 2012 SDK

After build the project go to bin folder and install the TfsBranchToolVSExtension.vsix file into Visual Studio 2012.
Go to a project collection in Source Control Explorer. There will be only your solution folder and the build process templates. For this demo I have created my project collection in  Team Foundation Service.
Apply initial branching structure like below.
In the dialog you can select Basic, Feature or MainOnly branching structures. But if you want more branching types you have to do appropriate changes for the downloaded codeplex project. For this demo, select Basic Branch plan and apply it.
After the branch plan has applied, new branches(Dev and Main) will be added like below.
For more details about Branching Plans, go through the Branching and Merging Guide.

Monday, December 3, 2012

Web Sockets

According to w3c web socket is, "An API that enables Web pages to use the Web Sockets protocol for two-way communication with a remote host".

HTTP is a request reply protocol.When client loads a page, it'll only load the page. But using Ajax, we could do the periodic polling. That means, according to the user events, page will load new data from the server. But still the HTTP request is started by the client.

Long polling is a technology that enable the server to send data to the client. The client send an HTTP request, server holds that request until there is data to return. Client sends a new request as soon as the previous request completes.

But there are issues with these technologies like, High latency(Periodic polling), Unintuitive (Long polling), Bandwidth overheads and scale out issues.

Using Web Sockets we can create a TCP socket connection between client and the server. That means, a persistent connection between client and the server and any party can send data to other party at any time.

Advantages

  • New inter-operable technology, undergoing standardization
  • Full duplex bidirectional connection
  • W3C java-script API
  • Secure connection
  • High performance (Low latency, Low bandwidth overhead)
  • Cross - domain connection

Sunday, December 2, 2012

Data Driven Coded UI Tests

Coded UI is automated tests which driven through the application UI. The coded UI test performs actions on the user interface controls for an application and verifies that specified controls display the correct values.

Assume you have a WPF application like below. You can enter the name and then press Go button. Then it'll show a label which has Hello Dilan like below.
Assume you have below UI steps like LaunchApplication, EnterTheName, AssertTheLabelValue and CloseApplication.
When you create a Action Record method like EnterTheName then Visual Studio will generate a class called EnterTheNameParams. Also for the assertions like AssertLabelValue Visual Studio will generate a class like AssertLabelValueExpectedValues. So you can create a test method like below.
After create a Coded UI test, you need to run that for different sets of data to test different conditions. To do that we can use a data source like CSV, Excel, XML, SQL Express and etc.
If you have VS 2010 open Test View window. In the properties of test, you can add a data connection string. So the rest of the code will generate by Visual Studio.
But if you have VS 2012, the Test Window has deprecated. So you have to manually add the data source and add the relevant attributes. For example, I have used Data.csv file like below.
Add Data.csv file in to the project.
Then insert the DataSource attribute directly in the code, in the line immediately above your test method. Also change the code to retrieve the values from data-source.
You don't have to add any loop to run the test for each condition. Coded UI will automatically handle that. So this test will be run for thee times, because there are three rows in the data source.

Monday, November 26, 2012

Bundling and Minification with VS 2012

In my previous post I have explained how to do bundling and minification in general way. But in this post I'm going to tell how to do bundling and minification using VS 2012. And also this will continue the demo from the previous post.
Add Web Essentials 2012 for the VS 2012 using Extensions and Updates.
In the MVC project select the three script files and right click. Select, Create JavaScript Bundle File as below. And give an appropriate name for the bundle.
This will create a bundle file. If change any of the dilanA.js, dilanB.js or dilanC.js then the bundle file will get updated.
In the default view of the DemoController refer the JavaScript file as below. That's it in VS 2012 for bundling and minification.

Advantage of the map File

The js.map file contains the source maps for each JavaScript file. But when we debug the code it's difficult to debug the minified the code. But currently some browsers are supporting for the map file debugging. In Google Chrome go to Settings and check the Enable Source Maps. Though you bundle and minified the JavaScript files, you can easily debug the JavaScript Source files. Not the minified JavaScript file.


Sunday, November 25, 2012

Bundling and Minification

Bundling and minification was introduced with ASP.net 4.5, which makes to improve the performance of the application. So this feature is useful in the production time than in the development time.
  • Bundling reduces the number of individual HTTP requests to the server. For example by combining multiple CSS files or JavaScript files into one single CSS file or JavaScript file.
  • Minification reduces the file download size of CSS or JavaScript by removing white spaces, comments, variable lengths and other unnecessary characters.
Create an ASP.net MVC project. In this post we'll consider about the JavaScript bundling. For that copy the jquery-1.7.1.js file in the Scripts folder and paste that file three times and rename those. For example dilanA.js,  dilanB.js and dilanC.js.
Add a new controller called DemoController and add the default action and the view. In the view add references for the above three JavaScript files.
Run the project and go to the Index page of the DefaultController. Using Google Chrome observe the network usage.
There are three requests for each JavaScript file and lot of time has consumed for each request. Now we have to bundle and minify the above three JavaScript files.
Bundling and minification is enabled or disabled by setting the value of debug attribute in the Web.config file.
To enable that, set the debug value to false.
You can override Web.config setting with the EnableOptimizations property on the BundleTable class. Add following code in the BundleConfig.cs file in the App-Start folder.
Add the following code into the RegisterBundles method in the BundleConfig.cs file.
Also in the default view of the DemoController, add the following code.
Now browse again the default view of the DemoController and check the network usage. Only one single request for all the three JavaScript files. And lesser time than previous request. Also the size of the requested file has minified, if we compare that to the total size of the all the three files.
Also we can use async attribute in HTML 5 for these bundling and minification. For that make the DOCTYPE tag in to HTML 5 standard. After that add the bundling and minification code like below.

Monday, November 19, 2012

JavaScript Development with TypeScript

TypeScript is a language for application-scale JavaScript development. It gives you type checking, explicit interfaces and easier module exports. The main advantages of the generated JavaScript file of the TypeScript are;

  • Any browser
  • Any host
  • Any OS
According to Somasegar "TypeScript is a super set of JavaScript that combines type checking and static analysis, explicit interfaces, and best practices into a single language and compiler. TypeScript  enables great tooling experiences for JavaScript development."

You can use TypeScript Play ground to check how this works on. But this post describes how to work on TypeScript using Visual Studio. First install the plugin for the VS 2012.

Create a TypeScript project.
Add a TypeScript file called customer.ts. Related customer.js file also in there.
Add the customer.js file reference to the default.htm file.
In the customer.ts file create a class called customer. Add two variables firstName as string and age as number.
Current typescript version is 0.8.1. So it's not generating the JavaScript while typing the TypeScript file. So you have to build the project. Then you can view the generated JavaScript.
Then add a constructor for the customer. firstName and the age properties can be set in the constructor. But last name has declared with public key. That means the customer class contains a property called lastName and it'll automatically set the values passed to constructor. The mobileNo is a nullable type of argument.
We can add a method called getFullName. Now we should check how to call the properties and the methods in the customer class. Declare a customer object and in the window.onmousemove event call a function.
You can see the output as follows.
TypeScript supports for the inheritance. If we extends a class, in the sub class we must call the super class's constructor. 
Also Typescript support for the interfaces. If we implements an interface we must implement the methods in that interface.
We can modularising the TypeScript classes. 
In order to avoid the long namespace we can use the import statements. 
Also the TypeScript have features like Refactor - Rename, Go to definition, Go to declaration, Find All references. Those are really useful features that are not in JavaScript.
As you can see TypeScript brings you useful features in to JavaScript and ultimately syntax friendly way of development.