In my previous post, we created a GraphQL API for student application. In this post, we are going to improve that API and add DataLoader functionality into GraphQL API.
In the API, you will get a following result for the below query. Therefore, we should do an improvement relates to fetching course registration query.
First, we will add merge.js file below. Then we should modify, courseRegistration.js file.
Now, you can query the API again like below and you will see the result.
However, the above implementation contains a huge performance issue. That is, there are situations, that we are fetching the same student and/or course record multiple times. As it is still a small API, you will not see a huge performance issue, but when the API becomes larger, these repetitive & costly database calls should not be there. Therefore, we are going to use DataLoader.
DataLoader will coalesce all individual loads which occur within a single frame of execution (a single tick of the event loop) and then call your batch function with all requested keys.
First, we should install the node module dependency. Then, we can change the merge.js file like below.
You can download the source code for this application from GitHub.
Dilla in Tech
An idea can transform the world and rewrite all the rules...
Tuesday, May 28, 2019
Monday, May 27, 2019
GraphQL with NodeJS
In this post, we are going to create a GraphQL API using NodeJS.
First, we will install the required node modules for the GraphQL API.
Then, we will create Student, Course and CourseRegistration models like below.
Next, we will focus on creating student functionality. In order to do that, we must define GraphQL schema for that. Create index.js file inside graphql/schema directory.
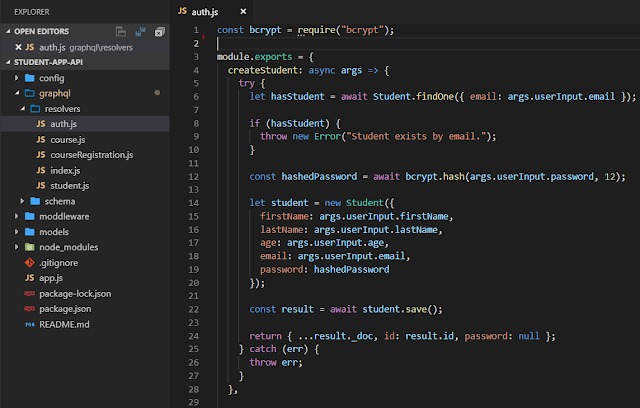
Then we will add a mapping resolver file to create student functionality. We call it auth.js and put it inside graphql/resolvers directory. When we create the student, we must encrypt the password. Therefore, we will use bcrypt node module for that.
As we are going to have many resolvers, we can define a central resolver file like below.
Next, we need to start the NodeJS backend server like below.
As we have enabled, graphiql: true we can make open graphiql console and create a student like below.
In the above implementation, we created a GraphQL mutation functionality. Now we are going to create a query functionality using GraphQL.
First, we add a query for Courses. Then we implement functionality to fetch courses.
We can use graphiql interface to query courses.
Now, we have created basic functionality of a GraphQL API. As developers, we must know how to trigger GraphQL API endpoint using HTTP. I am using Advanced Rest Client tool like below.
After that, you will see the return result like below.
You can download the source code for this application from GitHub.
Sunday, May 12, 2019
Integrate Selector into Redux state management
When we develop any application, we must consider about performance. In React application, when the state change, components will re-render. Even though, the change has happened only in a few fields of the state, but every component will re-render. This may affect to various computations that we do in front end. Therefore, Reselect came into the picture. Following are main reasons to use reselect in ReactJS application.
- Selectors can compute derived data, allowing Redux to store the minimal possible state
- Selectors are efficient. A selector is not recomputed unless one of its arguments changes
- Selectors are composable. They can be used as input to other selectors
Next, we should change StudentForm.jsx. Here we need to pass student id as a parameter to the reselect function.
You can download the source code for this application from GitHub.
Subscribe to:
Posts (Atom)


