Monday, August 3, 2015

Using Method Call In Meteor

In my last post I showed how to use publish/subscribe in meteor and how to allow access for specific  data in our database. But still every user have Create/Update/Delete privileges. Now we should remove those client side privilege and do those operations only in server side. To do that we can use meteor methods. The all the database functionalities can be execute only in server side.
First we will remove insecure package from meteor.
Run the application and try to create a student. You will get Access Denied Error.
Methods allow us to call database create/update/delete operation without executing that code in client side. First we will implement method for create student. Add studentMethods.js file into server folder and content should be like below.
Then modify studentCreate.js file like below. Then student create should work fine.
Download source code from github.

Meteor Publish and Subscribe

In my last post I showed how to access route parameters in meteor application. In this post I will explain how to implement publish/subscribe in meteor application.
For development purposes meteor has added several packages which we should remove before final implementations. One package is autopublish. In our current application, though we show/hide details depending on logged in users, any user can access all data using browser console. 
But for users collections, which is provided by accounts package, will only show data related to current user. Because internally accounts package handle security for us.
Allow access for all data impact for security and also for performance. But we can remove those by removing autopublish package and allow access to those collections in a different way.
First we will remove that package.
Then add publications.js file into server folder and content should be like below.
Then we need to subscribe for Students collection. Every template does not need Students collections. So, we should subscribe for Students collection in an appropriate place while considering performance. So we will put that to routes which need students collection.
But we should think what will happen when we deploy into to remote server and access it. It will take some time to load student data for each client. Therefore it's better if we add a loading content. Add loading.html file like below.
Then in routes.js add loadingTemplate like below.
Then modify students and studentDetails routes like below.
Download source code from github.

Access Route Parameters from Meteor

Every web application need to access URL parameters. In meteor, using routes, we need to access URL parameters. This post will continue with the code implemented in my last post.
First we will add StudentDetails.html file which has content like below.
In the routes.js add new route for studentDetails.
Then we will modify studentList.html file.
Run the application now. Then you will see students details page like below.
Download source code from github.

Sunday, August 2, 2015

Meteor User Account Management

In my last post I showed how to use routing in meteor application. In this post I will show how to implement user management in meteor application.
First install accounts-password package. This has accounts management implemented functions.
Then create signIn and signUp templates.
Then add routing paths for those.
Add signUp.js file and content should be like below. In here I have defined submit handle in onRendered function rather than implementing it in Template.event.
Then add nav.html template and content should be like below.
Add nav.js file and it's content should be like below.
Then main.html file should refactored like below.
Add sigIn.js file and content should be like below.
In nav.html, though we hide navigation menu item for students/create page for not logged user, he/she can type URL and access the page. To secure this, in routes.js, modify createStudent route.
Browse for student list page. You will see five rows order by first name.
Download source code from github.

Saturday, August 1, 2015

Meteor Application with Routing

In my last post I showed how to validate a form. This post I will explain how to add routing to a meteor application.
First add iron router plugin for the application.
Then we need to configure routes for the application.
Then add a new file called home.html into templates folder like below.
Application would look like below.
Rename client/home.html file into main.html and change the content like below.
Add route configurations to both/routes.js file like below. Output would look like below.
Now we will add bootstrap navigation.
Without using hard coded routes we can use route names like below.
Download source code from github.

Meteor Form Validation

In my last post I showed how to save form data in meteor. In this post I will show how to validate form data.
For the form validation we will use JQuery validation plugin from atmospherejs. First we will install that.
We need to attach our validation logic when createStudent template is inserted to the DOM. For that we can use Template_onrendered function which is provided by meteor.
Then add required attribute to form controls.
Now check the form by changing input values. It will trigger validation functions.
You can add style.css into style folder to make the form more beautiful.
You can customize the error messages like below.
And also you can add your custom validations like below.
Download source code from github.

Meteor Form Submit

In my last post I showed how to getting start with a meteor application. In this post I will show how to submit a form in a meteor application.
First we will create a meteor application called SchoolApp.
Create following folders inside of SchoolApp folder. You can delete all files which was created by default.
Inside client folder create home.html and add following content. Then run meteor application and you will see output like below.
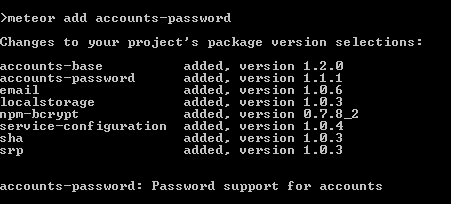
For front end design we will use bootstrap. Add bootstrap using following command.
In the client folder create a folder called templates and inside that add createStudent.html file. It's content should be like below.
Include studentCreate template in home.html file like below. You will see the form like below.
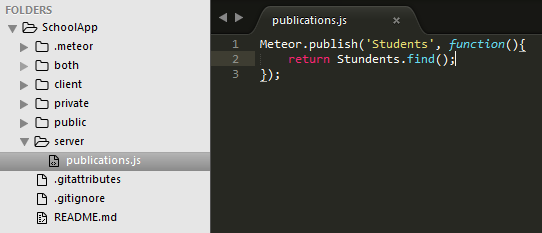
When an user save a student, we must save that student into our database. Create collections.js file in both folder and add students collection into that. All the students will save into this collection.
Add studentCreate.js file into templates folder and add content like below. Then save a student from browser.
Go to application folder using command prompt and enter following commands. You will see the data that you have inserted,
Now add studentList.html file like below.
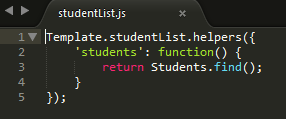
Add studentList.js file like below.
Add studentList into home.html file and you will see browser output like below.
Download source code from github.