Showing posts with label Windows Azure. Show all posts

Thursday, November 13, 2014

Deploy and Debug Azure WebJobs

In my last post I have explained about the Azure WebJobs. In this post I'll explain how to deploy and debug WebJobs. So this demo will continue with the development work which we have done in the last post.
First right-click the WebClient web application project and select publish.
In the opened dialog box you have to select Microsoft Azure Web Site as the publish target.
Sign into a an Azure subscription.
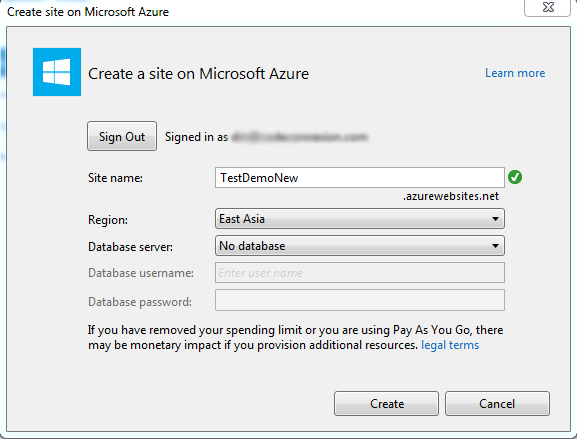
I haven't create a web site for this demo in Azure. So create a new web site.
Publish the web site.
When you select the configurations, select configuration as debug. Because we will be going to debug this application using VS 2013. So that select will enable the remote debugging.
This web site will be published to the Azure and you'll be able to see that in Azure portal. WebJobs will be run from the App_Data folder of an existing WebSite. So the contents of the WebJobs will be deployed to the App_Data folder.
Log in to Windows Azure using VS 2013. Because for this demo we try to utilize most of the tools provided by Visual Studio. After that you'll be able to see the Web Site which we created recently and the WebJobs which we have deployed with that WebSite.
Azure WebJobs are using Azure Storage Queues for passing messages through queues and storing and retrieving files from Azure Blob containers, And also statistics about how and when WebJobs were executed details are stored in Azure Storage. For these things, Azure WebSite must have storage account connection strings. So using Visual Studio Server Explorer, create a new Azure Storage.
In the properties of newly created storage, you can find the connection string.
Right-click and open the Azure Web Site settings panel.
In there create new connection strings named AzureWebJobsStorage and AzureWebJobsDashboard. Paste the value of the Azure Storage connection string for the above values.
Now the WebSite and WebJobs are deployed and configured correctly. Then select attach Debugger and Run menu items appropriately for the WebJobs.

Azure Web Jobs

Azure WebJob is a light weight process for a Azure WebSite. So we must not do heavy tasks as it will run on top of the WebSite itself. WebSite is a container for WebJobs. WebJobs run outside of the WebSite and run parallel to w3wp process. Each WebJob is a separate process running in the VM. The WebJobs SDK has a binding and trigger system which works with Microsoft Azure Storage Blobs, Queues and Tables as well as Service Bus Queues.
Difference between Azure WebJob and a Azure WorkerRole is Azure WebRoles are designed for heavy tasks and WebJobs are designed for light weight tasks.

Currently there are three different ways of scheduling job in Azure WebJobs.

  1. Continuous
  2. Scheduled
  3. On demand
In this demo I'll show how to create various types of WebJobs using Visual Studio 2013.

Create an ASP.net MVC project like below.
Then right click on the WebClient project, in the menu select Add and then select New Azure WebJob Project.
In the popup form, specify the WebJob name and the WebJob run mode. As I have mentioned above there are three types of WebJobs. 
First we will create a Run Continuously mode and create a WebJob. This will allow the continuous WebJob to remain in memory so that it can monitor an Azure Storage Queue for incoming messages.
This will add a project to the solution like below.
In the Program.cs file, JobHost will be start up the WebJob and block it from existing. So the WebJob continuously remain in the memory. 
In the Functions.cs file, there's a trigger for a AzureQueue called queue. QueueTrigger attribute is used to define a method parameter as one that will be populated when messages land on the Storage Queue being watched by the code. (There are other various attributes for monitor Queues, Blobs, or Service Bus objects.)
Create another project for Run On Demand Azure WebJob like below. These types of WebJobs will run only when a user elects to run the WebJob from within Visual Studio or from the Azure Management Portal.
This will add another project to the solution. 
In the Program.cs file, JobHost doesn't block the WebJob's EXE from exiting. Instead, it presumes a one-time run is needed, and then the WebJob simply exits. And also according to the code this WebJob will run a method called ManualTrigger
In the Functions.cs file, ManualTrigger methods has defined. There a method attribute called NoAutomaticTrigger which indicates a function for which no automatic trigger listening is performed.

Saturday, March 8, 2014

Windows Azure Queue Storage

In my previous post I explained about Windows Azure Storage and how to create it via Azure portal. In this post I'll explain about Azure Queue storage.

Windows Azure Queue storage is a service for storing large numbers of messages that can be accessed from anywhere in the world via authenticated calls using HTTP or HTTPS.

If you are going to use development storage you may have to consider about azure storage client library version and emulator version. When I was using development storage version 2.2 with Azure storage client library version 3, I got some errors related to invalid HTTP headers and 400 Bad request issues. Please go through this link if you are going to use development storage.

Add new cloud project and add web role and a worker role.
Expand server explorer, you can see the azure storage explorer.
Add QueueStorage connection string to the web role cloud service config file.
Add following code to Home controller.
You must consider following naming conventions for Azure Queues.

  • A queue name must start with a letter or number, and can only contain letters, numbers, and the dash (-) character. 
  • The first and last letters in the queue name must be alphanumeric. The dash (-) character cannot be the first or last character. Consecutive dash characters are not permitted in the queue name.
  • All letters in a queue name must be lowercase.
  • A queue name must be from 3 through 63 characters long.
After run this code it will create a new queue container in Azure and add a message. But you won't be able to see the Queue container in Azure portal. Because that feature is not facilitated yet by Azure team. Refresh the storage explorer in Visual Studio. Open the queue. You can see the queue message in queue container. In Azure queue message will expire after 7 days.

Now we'll look at how to consume queue messages from worker role.
Add following code to worker role.
After you call queue.GetMesage(), that message becomes invisible. That means no one allows to read that message. At the end you can delete the message. But if that process crashed after a few time message again visible in queue. That means there is an invisibility time for a queue message. You can further read about Poison Message handling in Queues.

Windows Azure Storage

Windows Azure storage consists of blobs, tables, and queues. It is accessible with HTTP/HTTPS requests. It is distinct from SQL Azure.
If you try to create a storage account from Azure Portal, you have to enter following details.
Location/Affinity group - A geographic location of you cloud service deployments which will affects for the performance by putting near to your target audience.

Geo redundant replication - This enables replicating your data in to a secondary location within the same region. This enable the fail over handling.

Locally redundant storage - Locally redundant data is replicated three times in same data center. All storage in Windows Azure is locally redundant.

After you create the storage account in the dash board you can see the end point URLs. This represents the namespace of blob, queue and table in your storage.
Container - This provides set of storage types. A storage account can contain an unlimited number of containers.