Showing posts with label HTML 5. Show all posts

Sunday, August 2, 2015

Meteor User Account Management

In my last post I showed how to use routing in meteor application. In this post I will show how to implement user management in meteor application.
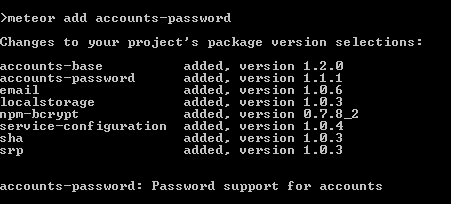
First install accounts-password package. This has accounts management implemented functions.
Then create signIn and signUp templates.
Then add routing paths for those.
Add signUp.js file and content should be like below. In here I have defined submit handle in onRendered function rather than implementing it in Template.event.
Then add nav.html template and content should be like below.
Add nav.js file and it's content should be like below.
Then main.html file should refactored like below.
Add sigIn.js file and content should be like below.
In nav.html, though we hide navigation menu item for students/create page for not logged user, he/she can type URL and access the page. To secure this, in routes.js, modify createStudent route.
Browse for student list page. You will see five rows order by first name.
Download source code from github.

Saturday, August 1, 2015

Meteor Application with Routing

In my last post I showed how to validate a form. This post I will explain how to add routing to a meteor application.
First add iron router plugin for the application.
Then we need to configure routes for the application.
Then add a new file called home.html into templates folder like below.
Application would look like below.
Rename client/home.html file into main.html and change the content like below.
Add route configurations to both/routes.js file like below. Output would look like below.
Now we will add bootstrap navigation.
Without using hard coded routes we can use route names like below.
Download source code from github.

Meteor Form Validation

In my last post I showed how to save form data in meteor. In this post I will show how to validate form data.
For the form validation we will use JQuery validation plugin from atmospherejs. First we will install that.
We need to attach our validation logic when createStudent template is inserted to the DOM. For that we can use Template_onrendered function which is provided by meteor.
Then add required attribute to form controls.
Now check the form by changing input values. It will trigger validation functions.
You can add style.css into style folder to make the form more beautiful.
You can customize the error messages like below.
And also you can add your custom validations like below.
Download source code from github.

Meteor Form Submit

In my last post I showed how to getting start with a meteor application. In this post I will show how to submit a form in a meteor application.
First we will create a meteor application called SchoolApp.
Create following folders inside of SchoolApp folder. You can delete all files which was created by default.
Inside client folder create home.html and add following content. Then run meteor application and you will see output like below.
For front end design we will use bootstrap. Add bootstrap using following command.
In the client folder create a folder called templates and inside that add createStudent.html file. It's content should be like below.
Include studentCreate template in home.html file like below. You will see the form like below.
When an user save a student, we must save that student into our database. Create collections.js file in both folder and add students collection into that. All the students will save into this collection.
Add studentCreate.js file into templates folder and add content like below. Then save a student from browser.
Go to application folder using command prompt and enter following commands. You will see the data that you have inserted,
Now add studentList.html file like below.
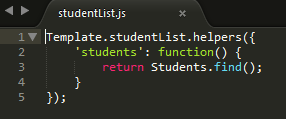
Add studentList.js file like below.
Add studentList into home.html file and you will see browser output like below.
Download source code from github.

Tuesday, July 21, 2015

Getting Started With Meteor.js

Meteor JS is a Full Stack javascript library which contain front-end libraries and NodeJS based server. Meteor allows us to build a web application quickly.You can follow the steps in MeteorJS site for install meteor into your machine.
In this post I will go through default meteor application.
First create a new meteor application called MyDemoApp.
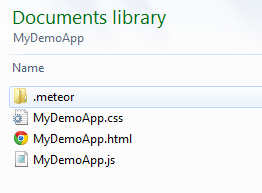
Default file structure would look like below.
Using meteor command start the application.
Using Chrome developer tools you will be able to see source code.
But remember, this code is the source code after javascript code is executed. So, to view initial source code, right click on page and select View Page Source.
In here, you will see an empty body tag. Reason for that is, meteor engine will see the body tag as a meteor template. So, that template will inject when the DOM get loaded. In source code, there are lots of javascript flies are linked. Those are files from meteor core packages. And also it will contains third-party libraries.
In production release, all the files get minified in to one file like below.

Thursday, June 25, 2015

AutoFill Attribute in Google Chrome

People consider about their valuable time a lot. When they fill a web form, if they get suggestion values, that would be a great advantage for them. Specially in mobile phones, if the web page suggests accurate values, that would be a supportive thing fr users.
Google chrome has provided autofill on forms using their browser.
As web developers only thing you have to do is use autocomplete attribute  correctly.
In WHATWG HTML Standard you can find more about name values for autocomplete attribute.

Saturday, April 18, 2015

Using Ionic with Apache Cordova

I wrote several blog posts(Apache Cordova with Angular JS, and Using a Cordova Plugin with Visual Studio) relates to Apache Cordova. In those applications, I used Bootstrap and FontAwesome for user interface designs. This is not wrong since we used Html 5 for hybrid mobile application development using Apache Cordova. However, we need to think again are those UI and icons are the best for a mobile specific application user interface.
Ionic is a framework, which mainly focused on look and feel of mobile applications.
In this post I will explain how to use Ionic for Html 5 hybrid application development. I'm using Visual Studio 2015 preview. I couldn't find any Visual Studio 2015 project templates for Ionic. Therefore, download Ionic from Github. For Visual Studio 2013 you could download Visual Studio Ionic Project Template.
First create a Blank Cordova Application like below.
Add Ionic files into framework folder.
Add Angular JS main module in to app folder.
Add welcomeView.html file like below. The content should write according to ion-view.
Modify index.html file like below. In here I used ion-nav-view which tracks user navigation history.
Run your application. You will see home screen like below.
Now it's time to modify the app for user friendly views. Add menu.html file and content should be like below. In here I used ion-side-menus directive.
Add another html page called, studentListView.html file. Content should be like below. This will show a list of students and I used item avatar css class from Ionic. I wrote a whole list of students. However you can use web api with angular repeat directive.
Modify, app.js file like below. In here I used angular js nested views.
Run your application, You will see a side menu with Home and Student List links.
For a mobile application it's better to have a footer with some icons. Therefore, modify index.html file and add ionic tabs like below.
You will see the footer of application like below.