Wednesday, April 15, 2015

Apache Cordova with Angular JS

Apache Cordova is a platform for building native mobile applications using HTML, CSS and JavaScript. In this post I will create a sample hybrid mobile application using Cordova. This application will mainly use Angular JS. I will use most of the codes from my previous post.
You can easily install Cordova using Visual Studio plugins.
Create a Blank Cordova Application.
Project structure looks like below. When Cordova starts, it will initiate to run index.html file as the start up page. There you will find references of cordova.js and platformoverrides.js which are mainly used by Cordova, when it package the application for different mobile specific packages.
And also, index.js file is another important file which contains mobile application specific lifetime events.
Download Jquery, Bootstrap, Angular, Angular-resource, Angular-router, Angular-touch and FontAwesome and then save javascripts, CSS and fonts accordingly.
Add references of javascripts and css files into index.html file.
Add Angular main module in to app folder like below.
As I have mentioned before, I copied several files from my previous project which relates to previous post. Therefore, I won't explain much about the content. welcomeView.html file is like below.
studentListViewController.js file content is like below.
studentListView.html file content should be like below.
studentDetailViewController.js file content should be like below.
studentDetailView.html file should like below.
commonService.js file content is like below.
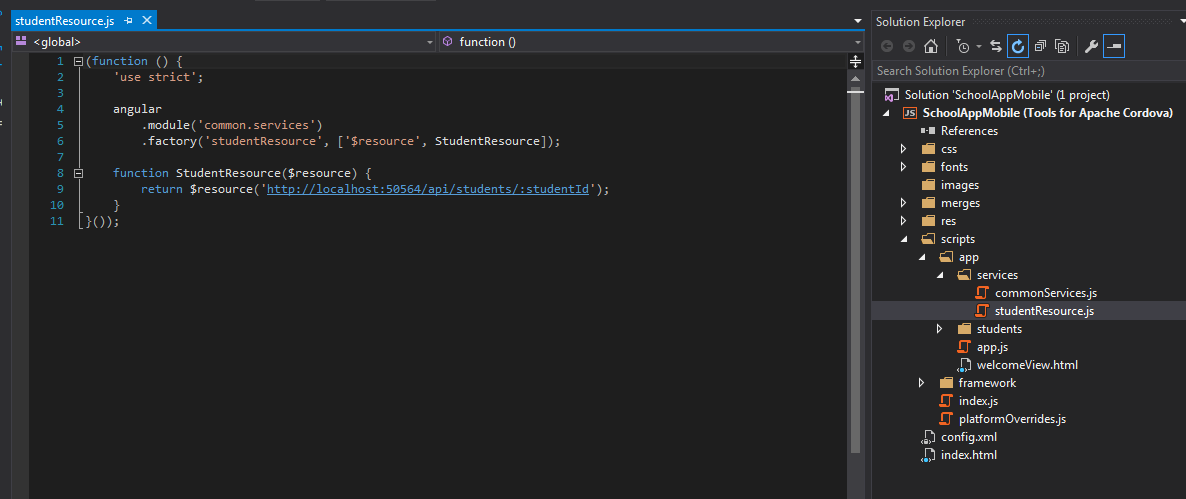
studentResource.js file should be like below.
Change index.html file like below.
Then add application specific javascript files.
Now run the application. Sometimes, Visual Studio get crashed(may be I'm using 2015 preview version). Therefore I think it is better if you enable Detailed build output. To do that, go to Tools -> Options and then select Detailed according to following way.
You must run your previous application which contains web api controllers. Reason for that is, you have specified a web api URL, in studentResource.js file.
Following are the screens of Home, List and Detail view.

Sunday, April 12, 2015

Validations with Angular JS

In this post I will explain how to use basic form validations with Angular JS. This will continue with the code written in my previous post.
Add web api controller action like below.
Add studentEditInfoController.js file like below.
Add studentEditInfoView.html  file below.
In here, I have used novalidate attribute. This will disable browser based validations. Using an angular condition, I have enabled to add has-error bootstrap class dynamically. In FirstName filed I gave min length and add required form attribute. Also I have disabled Save button till all validations passes for the form .
Modify, app.js locations.
When there are validation errors, the form will look like,

Routing With Angular JS

In this post I will explain how to set up routing with Angular JS. This will continue with the implementations done in previous post.
In wwwroot folder, create student folder like below. In that folder, create studentListView.html file.
From index.html file, cut html code of table tag and paste it in to studentListView.html You have to modify the code in studentListView.html which helps to have a user friendly interface.
In the index.html file, remove ng-Controller and change ng-app directives like below. Also you need to and angular-route javascript file which supports for routing.
Modify app.js file like below. In each route, we must define templateUrl which provides html file location for that particular route.  At the end, I have enabled html5Mode, which allows to use natural urls.
Now, run the application and it will show list of students like below.
Add welcomeView.html file to the app folder.
Change app.js file like below. In here, I have modified url for Student List.
Change index.html file like below.
Run the application again. For default URL, page would looks like,
When you browse for student list, it will show,
Refresh the students page. This will give 404 error. Reason for that is, in here we are using client side routing and not a server side route.
To get rid from that error add web.config into wwwroot folder like below.
Change StudentsApiController.cs file to retrieve a student by id. 
Add studentDetailController.js file like below. 
Add studentDetailView.html file like below.
You must change routes in app.js file like below.
Change studentListView.html file like below.
Run the application. In the student list click on name. You will see below page.